Category Archives: Science: Physics, Astronomy, etc.

Toxic electrochemistry and biology at home

A few weeks back, I decided to do something about the low quality of experiments in modern chemistry and science sets; I posted to this blog some interesting science experiments, and some more-interesting experiments that could be done at home using the toxic (poisonous dangerous) chemicals available under the sink or on the hardware store. Here are some more. As previously, the chemicals are toxic and dangerous but available. As previously, these experiments should be done only with parental (adult) supervision. Some of these next experiments involve some math, as key aspect of science; others involve some new equipment as well as the stuff you used previously. To do them all, you will want a stop watch, a volt-amp meter, and a small transformer, available at RadioShack; you’ll also want some test tubes or similar, clear cigar tubes, wire and baking soda; for the coating experiment you’ll want copper drain clear, or copper containing fertilizer and some washers available at the hardware store; for metal casting experiment you’ll need a tin can, pliers, a gas stove and some pennies, plus a mold, some sand, good shoes, and a floor cover; and for the biology experiment you will need several 9 V batteries, and you will have to get a frog and kill it. You can skip any of these experiments, if you like and do the others. If you have not done the previous experiments, look them over or do them now.

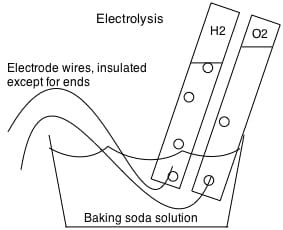
1) The first experiments aim to add some numerical observations to our previous studies of electrolysis. Here is where you will see why we think that molecules like water are made of fixed compositions of atoms. Lets redo the water electrolysis experiment now with an Ammeter in line between the battery and one of the electrodes. With the ammeter connected, put both electrodes deep into a solution of water with a little lye, and then (while watching the ammeter) lift one electrode half out, place it back, and lift the other. You will find, I think, that one of the other electrode is the limiting electrode, and that the amperage goes to 1/2 its previous value when this electrode is half lifted. Lifting the other electrode changes neither the amperage or the amount of bubbles, but lifting this limiting electrode changes both the amount of bubbles and the amperage. If you watch closely, though, you’ll see it changes the amount of bubbles at both electrodes in proportion, and that the amount of bubbles is in promotion to the amperage. If you collect the two gasses simultaneously, you’ll see that the volume of gas collected is always in a ratio of 2 to 1. For other electrolysis (H2 and Cl2) it will be 1 to1; it’s always a ratio of small numbers. See diagram below on how to make and collect oxygen and hydrogen simultaneously by electrolyzing water with lye or baking soda as electrolyte. With lye or baking soda, you’ll find that there is always twice as much hydrogen produced as oxygen — exactly.

You can also do electrolysis with table salt or muriatic acid as an electrolyte, but for this you’ll need carbon or platinum electrodes. If you do it right, you’ll get hydrogen and chlorine, a green gas that smells bad. If you don’t do this right, using a wire instead of a carbon or platinum electrode, you’ll still get hydrogen, but no chlorine. Instead of chlorine, you’ll corrode the wire on that end, making e.g. copper chloride. With a carbon electrode and any chloride compound as the electrolyte, you’ll produce chlorine; without a chloride electrolyte, you will not produce chlorine at any voltage, or with any electrode. And if you make chlorine and check the volumes, you’ll find you always make one volume of chlorine for every volume of hydrogen. We imagine from this that the compounds are made of fixed atoms that transfer electrons in fixed whole numbers per molecule. You always make two volumes of hydrogen for every volume of oxygen because (we think) making oxygen requires twice as many electrons as making hydrogen.

At home electrolysis experiment

At home electrolysis experiment

We get the same volume of chlorine as hydrogen because making chlorine and hydrogen requires the same amount of electrons to be transferred. These are the sort of experiments that caused people to believe in atoms and molecules as the fundamental unchanging components of matter. Different solutes, voltages, and electrodes will affect how fast you make hydrogen and oxygen, as will the amount of dissolved solute, but the gas produced are always the same, and the ratio of volumes is always proportional to the amperage in a fixed ratio of small whole numbers.

As always, don’t let significant quantities of use hydrogen and oxygen or pure hydrogen and chlorine mix in a closed space. Hydrogen and oxygen is quite explosive brown’s gas; hydrogen and chlorine are reactive as well. When working with chlorine it is best to work outside or near an open window: chlorine is a poison gas.

You may also want to try this with non-electrolytes, pure water or water with sugar or alcohol dissolved. You will find there is hardly any amperage or gas with these, but the small amount of gas produced will retain the same ratio. For college level folks, here is some physics/math relating to the minimum voltage and relating to the quantities you should expect at any amperage.

2) Now let’s try electro-plating metals. Using the right solutes, metals can be made to coat your electrodes the same way that bubbles of gas coated your electrodes in the experiments above. The key is to find the right chemical, and as a start let me suggest the copper sulphate sold in hardware stores to stop root growth. As an alternative copper sulphate is often sold as part of a fertilizer solution like “Miracle grow.” Look for copper on the label, or for a blue color fertilizer. Make a solution of copper using enough copper so that the solution is recognizably green, Use two steel washers as electrodes (that is connect the wires from your battery to the washers) and put them in the solution. You will find that one side turns red, as it is coated with copper. Depending on what else your copper solution contained, bubbles may appear at the other washer, or the other washer will corrode. 

You are now ready to take this to a higher level — silver coating. take a piece of silver plated material that you want to coat, and clean it nicely with soap and water. Connect it to the electrode where you previously coated copper. Now clean out the solution carefully. Buy some silver nitrate from a drug store, and dissolve a few grams (1/8 tsp for a start) in pure water; place the silverware and the same electrodes as before, connected to the battery. For a nicer coat use a 1 1/2 volt lantern battery; the 6 V battery will work too, but the silver won’t look as nice. With silver nitrate, you’ll notice that one electrode produces gas (oxygen) and the other turns silvery. Now disconnect the silvery electrode. You can use this method to silver coat a ring, fork, or cup — anything you want to have silver coated. This process is called electroplating. As with hydrogen production, there is a proportional relationship between the time, the amperage and the amount of metal you deposit — until all the silver nitrate in solution is used up.

As a yet-more complex version, you can also electroplate without using a battery. This was my Simple electroplating (presented previously). Consider this only after you understand most everything else I’ve done. When I saw this the first time in high school I was confused.

3) Casting metal objects using melted pennies, heat from a gas stove, and sand or plaster as a cast. This is pretty easy, but sort of dangerous — you need parents help, if only as a watcher. This is a version of an experiment I did as a kid.  I did metal casting using lead that some plumbers had left over. I melted it in a tin can on our gas stove and cast “quarters” in a plaster mold. Plumbers no longer use lead, but modern pennies are mostly zinc, and will melt about as well as my lead did. They are also much safer.

As a preparation for this experiment, get a bucket full of sand. This is where you’ll put your metal when you’re done. Now get some pennies (1970 or later), a pair of pliers, and an empty clean tin can, and a gas stove. If you like you can make a plaster mold of some small object: a ring, a 50 piece — anything you might want to cast from your pennies. With parents’ help, light your gas stove, put 5-8 pennies in the empty tin can, and hold the can over the lit gas burner using your pliers. Turn the gas to high. In a few minutes the bottom of the can will burn and become red-hot. About this point, the pennies will soften and melt into a silvery puddle. By tilting the can, you can stir the metal around (don’t get it on you!). When it looks completely melted you can pour the molten pennies into your sand bucket (carefully), or over your plaster mold (carefully). If you use a mold, you’ll get a zinc copy of whatever your mold was: jewelry, coins, etc. If you work at it, you’ll learn to make fancier and fancier casts. Adult help is welcome to avoid accidents. Once the metal solidifies, you can help cool it faster by dripping water on it from a faucet. Don’t touch it while it’s hot!

A plaster mold can be made by putting a 50¢ piece at the bottom of a paper cup, pouring plaster over the coin, and waiting for it to dry. Tear off the cup, turn the plaster over and pull out the coin; you’ve got a one-sided mold, good enough to make a one-sided coin. If you enjoy this, you can learn more about casting on Wikipedia; it’s an endeavor that only costs 4 or 5 cents per try. As a safety note: wear solid leather shoes and cover the floor near the stove with a board. If you drop the metal on the floor you’ll have a permanent burn mark on the floor and your mother will not be happy. If you drop hot metal on your you’ll have a permanent injury, and you won’t be happy. Older pennies are made of copper and will not melt. Here’s a video of someone pouring a lot of metal into an ant-hill (kills lots of ants, makes a mold of the hill).

It's often helpful to ask yourself, "what would Dr. Frankenstein do?"

It’s nice to have assistants, friends and adult help in the laboratory when you do science. Even without the castle, it’s what Dr. Frankenstein did.

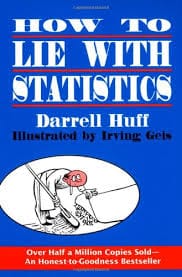
4) Bringing a dead frog back to life (sort of). Make a high voltage battery of 45 to 90 V battery by attaching 5-10, 9V batteries in a daisy chain they will snap together. If you touch both exposed contacts you’ll give yourself a wicked shock. If you touch the electrodes to a newly killed frog, the frog legs will kick. This is sort of groovy. It was the inspiration for Dr. Frankenstein (at right), who then decides he could bring a person back from the dead with “more power.” Frankenstein’s monster is brought back to life this way, but ends up killing the good doctor. Shocks are sometimes helpful reanimating people stricken by heat attacks, and many buildings have shockers for this purpose. But don’t try to bring back the long-dead. By all accounts, the results are less-than pleasing. Try dissecting the rest of the frog and guess what each part is (a world book encyclopedia helps). As I recall, the heart keeps going for a while after it’s out of the frog — spooky.

5) Another version of this shocker is made with a small transformer (1″ square, say, radioshack) and a small battery (1.5-6V). Don’t use the 90V battery, you’ll kill someone. As a first version of this shocker, strip 1″ of  insulation off of the ends of some wire 12″ long say, and attach one end to two paired wires of the transformer (there will usually be a diagram in the box). If the transformer already has some wires coming out, all you have to do is strip more insulation off the ends so 1″ is un-inuslated. Take two paired ends in your hand, holding onto the uninsulated part and touch both to the battery for a second or two. Then disconnect them while holding the bare wires; you’ll get a shock. As a nastier version, get a friend to hope the opposite pair of wires on the uninsulated parts, while you hold the insulated parts of your two. Touch your two to the battery and disconnect while holding the insulation, you will see a nice spark, and your friend will get a nice shock. Play with it; different arrangements give more sparks or bigger shocks. Another thing you can do: put your experiment near a radio or TV. The transformer sparks will interfere with most nearby electronics; you can really mess up a computer this way, so keep it far from your computer. This is how wireless radio worked long ago, and how modern warfare will probably go. The atom bomb was detonated with a spark like this.

If you want to do more advanced science, it’s a good idea to learn math. This is important for statistics, for engineering, for quantum mechanics, and can even help for music. Get a few good high school or college books and read them cover to cover. An approach to science is to try to make something cool, that sort-of works, and then try to improve it. You then decide what a better version would work like,  modify your original semi-randomly and see if you’re going in the right direction. Don’t redesign with only one approach –it may not work. Read whatever you can, but don’t believe all you read. Often books are misleading, or wrong, and blogs are worse (I ought to know). When you find mistakes, note them in the margin, and try to explain them. You may find you were right, or that the book was right, but it’s a learning experience. If you like you can write the author and inform him/her of the errors. I find mailed letters are more respectful than e-mails — it shows you put in more effort.

Robert Buxbaum, February 20, 2014. Here’s the difference between metals and non-metals, and a periodic table cup that I made, and sell. And here’s a difference between science and religion – reproducibility.

Nerves are tensegrity structures and grow when pulled

No one quite knows how nerve cells learn stuff. It is incorrectly thought that you can not get new nerves in the brain, nor that you can get brain cells to grow out further, but people have made new nerve cells, and when I was a professor at Michigan State, a Physiology colleague and I got brain and sensory nerves to grow out axons by pulling on them without the use of drugs.

I had just moved to Michigan State as a fresh PhD (Princeton) as an assistant professor of chemical engineering. Steve Heidemann was a few years ahead of me, a Physiology professor PhD from Princeton. We were both new Yorkers. He had been studying nerve structure, and wondered about how the growth cone makes nerves grow out axons (the axon is the long, stringy part of the nerve). A thought was that nerves were structured as Snelson-Fuller tensegrity structures, but it was not obvious how that would relate to growth or anything else. A Snelson-Fuller structure is shown below the structure stands erect not by compression, as in a pyramid or igloo, but rather because tension in the wires helps lift the metal pipes, and puts them in compression. The nerve cell, shown further below is similar with actin-protein as the outer, tensed skin, and a microtubule-protein core as the compress pipes. 

A Snelson-Fuller tensegrity sculpture in the graduate college courtyard at Princeton, where Steve and I got our PhDs

A Snelson-Fuller tensegrity sculpture in the graduate college courtyard at Princeton, an inspiration for our work.

Biothermodynamics was pretty basic 30 years ago (It still is today), and it was incorrectly thought that objects were more stable when put in compression. It didn’t take too much thermodynamics on my part to show otherwise, and so I started a part-time career in cell physiology. Consider first how mechanical force should affect the Gibbs free energy, G, of assembled microtubules. For any process at constant temperature and pressure, ∆G = work. If force is applied we expect some elastic work will be put into the assembled Mts in an amount  ∫f dz, where f is the force at every compression, and ∫dz is the integral of the distance traveled. Assuming a small force, or a constant spring, f = kz with k as the spring constant. Integrating the above, ∆G = ∫kz dz = kz2; ∆G is always positive whether z is positive or negative, that is the microtubule is most stable with no force, and is made less stable by any force, tension or compression. 

A cell showing what appears to be tensegrity. The microtubules in green surrounded by actin in red. If the actin is under tension the microtubules are in compression. From here.

A cell showing what appears to be tensegrity. The microtubules (green) surrounded by actin (red). In nerves Heidemann and I showed actin is in tension the microtubules in compression.

Assuming that microtubules in the nerve- axon are generally in compression as in the Snelson-Fuller structure, then pulling on the axon could potentially reduce the compression. Normally, this is done by a growth cone, we posited, but we could also do it by pulling. In either case, a decrease in the compression of the assembled microtubules should favor microtubule assembly.

To calculate the rates, I used absolute rate theory, something I’d learned from Dr. Mortimer Kostin, a most-excellent thermodynamics professor. I assumed that the free energy of the monomer was unaffected by force, and that the microtubules were in pseudo- equilibrium with the monomer. Growth rates were predicted to be proportional to the decrease in G, and the prediction matched experimental data. 

Our few efforts to cure nerve disease by pulling did not produce immediate results; it turns out to by hard to pull on nerves in the body. Still, we gained some publicity, and a variety of people seem to have found scientific and/or philosophical inspiration in this sort of tensegrity model for nerve growth. I particularly like this review article by Don Ingber in Scientific American. A little more out there is this view of consciousness life and the fate of the universe (where I got the cell picture). In general, tensegrity structures are more tough and flexible than normal construction. A tensegrity structure will bend easily, but rarely break. It seems likely that your body is held together this way, and because of this you can carry heavy things, and still move with flexibility. It also seems likely that bones are structured this way; as with nerves; they are reasonably flexible, and can be made to grow by pulling.

Now that I think about it, we should have done more theoretical or experimental work in this direction. I imagine that  pulling on the nerve also affects the stability of the actin network by affecting the chain configuration entropy. This might slow actin assembly, or perhaps not. It might have been worthwhile to look at new ways to pull, or at bone growth. In our in-vivo work we used an external magnetic field to pull. We might have looked at NASA funding too, since it’s been observed that astronauts grow in outer space by a solid inch or two, and their bodies deteriorate. Presumably, the lack of gravity causes the calcite in the bones to grow, making a person less of a tensegrity structure. The muscle must grow too, just to keep up, but I don’t have a theory for muscle.

Robert Buxbaum, February 2, 2014. Vaguely related to this, I’ve written about architecture, art, and mechanical design.

Toxic chemistry you can do at home

I got my start on science working with a 7 chemical, chemistry set that my sister got me when I was 7 years old (thanks Beverly). The chemicals would never be sold by a US company today — too much liability. What if your child poisons himself/herself or someone else, or is allergic, or someone chokes on the caps (anything the size of a nut has to be labeled as a hazard). Many of the experiments were called magic, and they were, in the sense that, if you did them 200 years earlier, you’d be burnt as a witch. There were dramatic color changes (phenolphthalein plus base, Prussian Blue) a time-delay experiment involving cobalt, and even an experiment that (as I recall) burst into fire on its own (glycerine plus granulated potassium permanganate).

Better evil through science. If you get good at this, the military may have use of your services.

“Better the evil you know.” If you get good at this, the military may have use of your services. Yes, the American military does science.

Science kits nowadays don’t do anything magically cool like that, and they don’t really teach chemistry, either, I think. Doing magical things requires chemicals that are reasonably reactive, and that means corrosive and/or toxic. Current kits use only food products like corn-starch or baking soda, and the best you can do with these is to make goo and/ or bubbles. No one would be burnt at the stake for this, even 300 years ago. I suppose one could design a program that used these materials to teach something about flow, or nucleation, but that would require math, and the kit producers fear that any math will turn off kids and stop their parents from spending money. There is also the issue of motivation. Much of historical chemistry was driven by greed and war; these are issues that still motivate kids, but that modern set-makers would like to ignore. Instead, current kits are supposed to be exciting in a cooperative way (whatever that means), because the kit-maker says so. They are not. I went through every experiment in my first kit in the first day, and got things right within the first week — showing off to whoever would watch. Modern kits don’t motivate this sort of use; I doubt most get half-used in a lifetime.

There are some foreign-made chemistry sets still that are pretty good. Here is a link to a decent mid-range one from England. But it’s sort of pricy, and already somewhat dumbed down. Instead, here are some cheaper, more dangerous, American options: 5 experiments you can do (kids and parents together, please) using toxic household chemicals found in our US hardware stores. These are NOT the safest experiments, just cheap ones that are interesting. I’ll also try to give some math and explanations — so you’ll understand what’s happening on a deeper level — and I’ll give some financial motivation — some commercial value.

1) Crystal Drano + aluminum. Crystal Drano is available in the hardware store. It’s mostly lye, sodium hydroxide, one of the strongest bases known to man. It’s a toxic (highly poisonous) chemical used to dissolve hair and fat in a drain. It will also dissolve some metals and it will dissolve you if you get it on yourself (if you do get it on yourself, wash it off fast with lots of water). Drano also contains ammonium nitrate (an explosive) and bits of aluminum. For the most part, the aluminum is there so that the Drano will get hot in the clogged drain (heat helps it dissolve the clog faster). I’ll explain the ammonium nitrate later. For this experiment, you’re going to want to work outside, on a dinner plate on the street. You’ll use additional aluminum (aluminum foil), and you’ll get more heat and fun gases. Fold up a 1 foot square of aluminum foil to 6″ x 4″ say, and put it on the plate (outside). Put an indent in the middle of the foil making a sort of small cup — one that can stand. Into this indent, put a tablespoon or two of water plus a teaspoon of Drano. Wait about 5 minutes, and you will see that the Drano starts smoking and the aluminum foils starts to dissolve. The plate will start to get hot and you will begin to notice a bad smell (ammonia). The aluminum foil will turn black and will continue to dissolve till there is a hole in the middle of the indent. Draino

The main reaction is 2 Al + 3 H2O –> Al2O3 + H2; that is, aluminum plus water gives you aluminum oxide (alumina), and hydrogen. The sodium hydroxide (lye) in the Drano is a catalyst in this reaction, something that is not consumed in this reaction but makes it happen faster than otherwise. The hydrogen you produce here is explosive and valuable (I explain below). But there is another reaction going on too, the one that makes the bad smell. When ammonium nitrate is heated in the presence of sodium hydroxide, it reacts to make ammonia and sodium nitrate. The reaction formula is: NH4-NO3 + NaOH –> NH3 + NaNO3 + H2O. The ammonia produced gives off a smell, something that is important for safety — the smell is a warning — and (I think) helps keep the aluminum gunk from clogging the drain by reacting with the aluminum oxide to form aluminum amine hydroxide Al2O3(NH3)2. It’s a fun experiment to watch, but you can do more if you like. The hydrogen and ammonia are flammable and is useful for other experiments (below). If you collect these gases, you can can make explosions or fill a balloon that will float. Currently the US military, and several manufacturers in Asia are considering using the hydrogen created this way to power motorcycles by way of a fuel cell. There is also the Hindenburg, a zeppelin that went around the world in the 1930s. It was kept aloft by hydrogen. The ammonia you make has value too, though toxic; if bubbled into water, it makes ammonium hydroxide NH3 + H2O –> NH4OH. This is a common cleaning liquid. Just to remind you: you’re supposed to do these experiments outside to dissipate the toxic gases and to avoid an explosion in your house. A parent will come in handy if you get this stuff on your hand or in your eye.

Next experiment: check that iron does not dissolve in Drano, but it does in acid (that’s experiment 5; done with Muriatic acid from the hardware store). Try also copper, and solder (mostly tin, these days). Metals that dissolve well in Drano are near the right of the periodic table, like aluminum. Aluminum is nearly a non-metal, and thus can be expected to have an oxide that reacts with hydroxide. Iron and steel have oxides that are bases themselves, and thus don’t react with lye. This is important as otherwise Drano would destroy your iron drain, not only the hair in it. It’s somewhat hard on copper though, so beware if you’ve a copper drain.

Thought problem: based on the formulas above figure out the right mix of aluminum, NaOH, water and Ammonium nitrate. Answer: note that, for every two atoms of aluminum you dissolve, you’ll need three molecules of water (for the three O atoms), plus at least two molecules of ammonium nitrate (to provide the two NH2 (amine) groups above. You’ll also want at least 2 molecules of NaOH to have enough Na to react with the nitrate groups of the ammonium nitrate. As a first guess, assume that all atoms are the same size. A better way to do this involves molecular weights (formula weights), read a chemistry book, or look on the internet.

Four more experiments can be seen here. This post was getting to be over-long.As with this experiment, wear gloves and eye protection; don’t drink the chemicals, and if you get any chemicals on you, wash them off quick.

Here are a few more experiments in electrochemistry and biology, perhaps I’ll add more. In the meantime, if you or your child are interested in science, I’d suggest you read science books by Mr Wizard, or Isaac Asimov, and that you learn math. Another thought, take out a high school chemistry text-book at the library — preferably an old one with experiments..

Robert Buxbaum, December 29, 2013. If you are interested in weather flow, by the way, here is a bit on why tornadoes and hurricanes lift stuff up, and on how/ why they form. 

Genetically modified food not found to cause cancer.

It’s always nice when a study is retracted, especially so if the study alerts the world to a danger that is found to not exist. Retractions don’t happen often enough, I think, given that false positives should occur in at least 5% of all biological studies. Biological studies typically use 95% confidence limits, a confidence limit that indicates there will be false positives 5% of the time for the best-run versions (or 10% if both 5% tails are taken to be significant). These false positives will appear in 5-10% of all papers as an expected result of statistics, no matter how carefully the study is done, or how many rats used. Still, one hopes that researchers will check for confirmation from other researchers and other groups within the study. Neither check was not done in a well publicized, recent paper claiming genetically modified foods cause cancer. Worse yet, the experiment design was such that false positives were almost guaranteed.

Séralini published this book, “We are all Guinea Pigs,” simultaneously with the paper.

As reported in Nature, the journal Food and Chemical Toxicology retracted a 2012 paper by Gilles-Eric Séralini claiming that eating genetically modified (GM) maize causes cancerous tumors in rats despite “no evidence of fraud or intentional misrepresentation.” I would not exactly say no evidence. For one, the choice of rats and length of the study was such that a 30% of the rats would be expected to get cancer and die even under the best of circumstances. Also, Séralini failed to mention that earlier studies had come to the opposite conclusion about GM foods. Even the same journal had published a review of 12 long-term studies, between 90 days and two years, that showed no harm from GM corn or other GM crops. Those reports didn’t get much press because it is hard to get excited at good news, still you’d have hoped the journal editors would demand their review, at least, would be referenced in a paper stating the contrary.

A wonderful book on understanding the correct and incorrect uses of statistics.

A wonderful book on understanding the correct and incorrect uses of statistics.

The main problem I found is that the study was organized to virtually guarantee false positives. Séralini took 200 rats and divided them into 20 groups of 10. Taking two groups of ten (one male, one female) as a control, he fed the other 18 groups of ten various doses of genetically modified grain, either alone of mixed with roundup, a pesticide often used with GM foods. Based on pure statistics, and 95% confidence, you should expect that, out of the 18 groups fed GM grain there is a 1- .9518 chance (60%) that at least one group will show cancer increase, and a similar 60% chance that at least one group will show cancer decrease at the 95% confidence level. Séralini’s study found both these results: One group, the female rats fed with 10% GM grain and no roundup, showed cancer increase; another group, the female rats fed 33% GM grain and no roundup, showed cancer decrease — both at the 95% confidence level. Séralini then dismissed the observation of cancer decrease, and published the inflammatory article and a companion book (“We are all Guinea Pigs,” pictured above) proclaiming that GM grain causes cancer. Better editors would have forced Séralini to acknowledge the observation of cancer decrease, or demanded he analyze the data by linear regression. If he had, Séralini would have found no net cancer effect. Instead he got to publish his bad statistics, and (since non of the counter studies were mentioned) unleashed a firestorm of GM grain products pulled from store shelves.

Did Séralini knowingly design a research method aimed to produce false positives? In a sense, I’d hope so; the alternative is pure ignorance. Séralini is a long-time, anti GM-activist. He claims he used few rats because he was not expecting to find any cancer — no previous tests on GM foods had suggested a cancer risk!? But this is mis-direction; no matter how many rats in each group, if you use 20 groups this way, there is a 60% chance you’ll find at least one group with cancer at the 95% confidence limit. (This is Poisson-type statistics see here). My suspicion is that Séralini knowingly gamed the experiments in an effort to save the world from something he was sure was bad. That he was a do-gooder twisting science for the greater good.

The most common reason for retraction is that the article has appeared elsewhere, either as a substantial repeat from the authors, or from other authors by plagiarism or coincidence. (BC Comics, by Johnny Hart, 11/25/10).

It’s important to cite previous work and aspects of the current work that may undermine the story you’d like to tell; BC Comics, Johnny Hart.

This was not the only major  retraction of the month, by the way. The Harrisburg Patriot & Union retracted its 1863 review of Lincoln’s Gettysburg Address, a speech the editors originally panned as “silly remarks”, deserving “a veil of oblivion….” In a sense, it’s nice that they reconsidered, and “…have come to a different conclusion…” My guess is that the editors were originally motivated by do-gooder instinct; they hoped to shorten the war by panning the speech.

There is an entire blog devoted to retractions, by the way:  http://retractionwatch.com. A good friend, Richard Fezza alerted me to it. I went to high school with him, then through under-grad at Cooper Union, and to grad school at Princeton, where we both earned PhDs. We’ll probably end up in the same old-age home. Cooper Union tried to foster a skeptical attitude against group-think.

Robert Buxbaum, Dec 23, 2013. Here is a short essay on the correct way to do science, and how to organize experiments (randomly) to make biassed analysis less likely. I’ve also written on nearly normal statistics, and near poisson statistics. Plus on other random stuff in the science and art world: Time travel, anti-matter, the size of the universe, Surrealism, Architecture, Music.

My failed process for wood to green gasoline

Most researchers publish the results of their successful projects, and ignore the rest. It’s an understandable failing given the cost and work to publish and the general sense that the project that flops indicated a loser – researcher. Still, it’s a shame, and I’d like to break from it here to describe a worthwhile project of mine that failed — turning wood into green gasoline. You may come to believe the project worthwhile too, and figure that you might learn from my story some pathways to avoid if you decide to try it. Besides I figure that it’s an interesting tale. All success stories are similar, I find; failure can come in many ways.

Failure can come from incorrect thinking – assumptions that are wrong. One basis of my thinking was the observation that gasoline, for the most part, was crude-oil that had been fluffed up with hydrogen. The density you buy weighs about 5.5 lb/gallon while crude oil weighs 9 lb/gallon. The difference is hydrogen. Perhaps wood too could be turned into gasoline if hydrogen were added. Another insight was that the structure of wood was the structure of a long chain -alcohol,  —(CHOH)-(CHOH)-(CHOH)—. My company had long experience breaking alcohols to make hydrogen. I figured we could do something similar with wood, fluffing up the wood by breaking the long-chain alcohols to short ones.

A possible first reaction step would be to break a C-O-C bond, a ketone bond, with hydrogen:

—(CHOH)-(CH2O)-(CHOH)— + H2 –>  —(CHOH)-CH2OH + CH2OH—

The next reaction step, I imagined was de-oxygenation:

—(CHOH)-CH2OH  +  H2 –>  —(CHOH)-CH3  + H2O

At this point, we are well on the way to making gasoline, or making a gasoline-relevant alcohol like C6H11-OH. The reactions I wanted were exothermic, meaning they would probably “go” — in actuality -∆G is the determinate of reaction favorability, but usually a -∆H and -∆G go together. Of course there are other reactions that I could have worried about –Ones that produce nasty goop. Among these:

–(CHOH)-(CH2O)-(CHOH)—  –> –(CO)-(C)-(CHOH)— + H2O +H2

I didn’t worry about these reactions because I figured I could outrun them using the right combination of a high hydrogen pressure, the right (low) temperature and the right catalyst. I may have been wrong. Then again, perhaps I picked the wrong catalyst – Fe2O3/ rust, or the wrong set of conditions. I picked Fe2O3 because it was cheap and active.

I convinced myself that Fe2O3 was sufficiently specific to get the product to a good 5-6 carbon compounds for gasoline. Wood celluloses are composed of five and six-carbon ring structure, and the cost of wood is very low per energy. What could go wrong? I figured that starting with these 5-6 carbon ring structures, virtually guaranteed getting high octane products. With the low cost and all the heat energy of the wood, wood + H2 seemed like a winning way to store and transport energy. If i got 6 carbon alcohols and similar compounds they’d have high-octane and the right vapor pressures and the products should be soluble in ordinary gasoline.

And the price was right; gasoline was about $3.50/ gallon, while wood was essentially free.  Hydrogen isn’t that expensive, even using electrolysis, and membrane reactors (a major product of our company) had the potential to make it cheaper. Wood + Hydrogen seemed like the cheaper version of syngas: CO +H2, and rust is similar to normal Fischer Tropsch catalyst. My costs would be low, and I’d expected to get better conversion since I should get fewer low molecular weight products like methane, ethane and methanol. Everything fundamental looked like it was in my favor.

With all the fundamentals in place, I figured my only problem would be to design a reasonably cheap reactor. At first I considered a fluidized bed reactor, but decided on a packed bed reactor instead, 8″ long by 3/4″ OD. This was a tube, filled with wood chips and iron oxide as a catalyst. I introduced high pressure hydrogen via a 150 psi hydrogen + 5% He mix. I hoped to see gasoline and water come out the other end. (I had the hydrogen – helium mix left over from a previous experiment, and was paying rental; otherwise I would have used pure hydrogen). I used heat tape and a controller to keep the temperature near-constant.

Controlling the temperature was key, I thought, to my aim of avoiding dehydration and the formation of new carbon-carbon bonds. At too high a temperature, the cellulose molecules would combine and lose water to form a brown high molecular weight tar called bio-oil, as well as methane and char. Bio-oil is formed the same way you form caramel from sugar, and as with sugar, it’s nothing you’d want to put in a car. If I operated at too low a temperature (or with the wrong catalyst) the reaction would be too slow, and the capital costs would be excessive. I could keep the temperature in the right (Goldilocks) temperature, I thought with the right catalyst and the right (high) hydrogen pressure.

No matter how I did this, I knew that I’d get some carbon-carbon bond formation, and perhaps a little char, but so long as it wasn’t too much it should be manageable. I figured I could hydrogenate the tar and remove the char at the end of the process. Most of the gasoline energy would come from the trees, and not the hydrogen, and there would be little hydrogen wasted forming methane. Trees would always be cheap: they grow quickly, and are great at capturing solar energy. Many cities pay for disposal of their tree waste, so perhaps a city would pay us to take their wood chips. With cheap wood, the economics would be good so long as used all the hydrogen I put in, and got some reasonable fraction of energy from the wood. 

i began my reaction at 150°C with 50 psi hydrogen. At these conditions, I saw no reaction; I then raised the temperature to 200°C, then raised the pressure to 100 psi (still nothing) and then tried 250°C, still at 100psi. By now we were producing water but it was impossible to tell if we were hydrogenating the cellulose to gasoline, or dehydrating the cellulose to bio-oil.

As it turned out we were getting something worse that bio-oil: bio-oil gunk. Instead of the nasty brown liquid that’s made when wood is cooked to dehydration (water removal, caramelization), I got something that was nastier than I’d imagined possible. The wood molecules did not form nice chains but combined to form acidic, aromatic gunk (aromatic in both senses: benzine-type molecules and smelly) that still contained unreacted wood as a sort of press-board. The gunk was corrosive and reactive; it probably contained phenol, and seemed bent on reacting to form a phenolic glue. I found the gunk was insoluble in most everything: water, gasoline, oil, methanol (the only exception was ethanol). As best I can tell, you can not react this gunk with hydrogen to make gasoline as it is non-volatile, and almost impossible to get out of my clogged reactor. Perhaps a fluidized bed would be would be better, but I’m afraid it would form wood clumps even there. 

I plan to try again, perhaps using higher pressure hydrogen and perhaps a liquid hydrogen carrier, to get the hydrogen to the core of the wood and speed the catalysis of the desired products. The key is finding a carrier that is not too expensive or that can be easily recovered.

Robert E. Buxbaum, Dec 13, 2013. Here’s something on a visit to my lab, on adding hydrogen to automobile engines, and on the right way to do science. And here’s my calculation for how much wood a woodchuck chucks if a woodchuck could chuck wood, (100 lbs/ night) plus why woodchucks do not chuck wood like beavers.

The 2013 hurricane drought

News about the bad weather that didn’t happen: there were no major hurricanes in 2013. That is, there was not one storm in the Atlantic Ocean, the Caribbean Sea, or the Gulf of Mexico with a maximum wind speed over 110 mph. None. As I write this, we are near the end of the hurricane season (it officially ends Nov. 30), and we have seen nothing like what we saw in 2012; compare the top and bottom charts below. Barring a very late, very major storm, this looks like it will go down as the most uneventful season in at least 2 decades. Our monitoring equipment has improved over the years, but even with improved detection, we’ve seen nothing major. The last time we saw this lack was 1994 — and before that 1986, 1972, and 1968.

Hurricanes 2012 -2013. This year looks like it will be the one with the lowest number and strength of modern times.

Hurricanes 2012 -2013. This year there were only two hurricanes, and both were category 1 The last time we had this few was 1994. By comparison, in 2012 we saw 5 category 1 hurricanes, 3 Category 2s, and 2 Category 3s including Sandy, the most destructive hurricane to hit New York City since 1938.

In the pacific, major storms are called typhoons, and this year has been fairly typical: 13 typhoons, 5 of them super, the same as in 2012.  Weather tends to be chaotic, but it’s nice to have a year without major hurricane damage or death.

In the news this month, no major storm lead to the lack of destruction of the boats, beaches and stately homes of the North Carolina shore.

In the news, a lack of major storms lead to the lack of destruction of the boats, beaches, and stately homes of the North Carolina shore.

The reason you have not heard of this before is that it’s hard to write a story about events that didn’t happen. Good news is as important as bad, and 2013 had been predicted to be one of the worst seasons on record, but then it didn’t happen and there was nothing to write about. Global warming is supposed to increase hurricane activity, but global warming has taken a 16 year rest. You didn’t hear about the lack of global warming for the same reason you didn’t hear about the lack of storms.

Here’s why hurricanes form in fall and spin so fast, plus how they pick up stuff (an explanation from Einstein). In other good weather news, the ozone hole is smaller, and arctic ice is growing (I suggest we build a northwest passage). It’s hard to write about the lack of bad news, still Good science requires an open mind to the data, as it is, or as it isn’t. Here is a simple way to do abnormal statistics, plus why 100 year storms come more often than once every 100 years.

Robert E. Buxbaum. November 23, 2013.

Physics of no fear, no fall ladders

I recently achieved a somewhat mastery over my fear of heights while working on the flat roof of our lab building / factory. I decided to fix the flat roof of our hydrogen engineering company, REB Research (with help from employees), and that required me to climb some 20 feet to the roof to do some work myself and inspect the work of others. I was pretty sure we could tar the roof cheaper and better than the companies we’d used in the past, and decided that the roof  should be painted white over the tar or that silvered tar should be used — see why. So far the roof is holding up pretty well (looks good, no leaks) and my summer air-conditioning bills were lowered as well.

Perhaps the main part of overcoming my fear of heights was practice, but another part was understanding the physics of what it takes to climb a tall ladder safely. Once I was sure I knew what to do, I was far less afraid. As Emil Faber famously said, “Knowledge is good.”

me on tall ladder

Me on tall ladder and forces. It helps to use the step above the roof, and to have a ladder that extends 3-4′ feet past roof level

One big thing I learned (and this isn’t physics), was to not look down, especially when you are going down the ladder. It’s best to look at the ladder and make sure your hands and feet are going where they should. The next trick I learned was to use a tall ladder — one that I could angle at 20° and extends 4 feet above the roof, see figure. Those 4 feet gave me something to hold on to, and something to look at while going on and off the ladder. I found I preferred to go to or from the roof from a rung that was either at the level of the roof, or a half-step above (see figure). By contrast, I found it quite scary to step on a ladder rung that was significantly below roof level even when I had an extended ladder. I bought my ladder from Acme Ladder of Capital St. in Oak Park; a fiberglass ladder, light weight and rot-proof.

I preferred to set the ladder level (with the help of a shim if needed) at an angle about 20° to the wall, see figure. At this angle, I felt certain the ladder would not tip over from the wind or my motion, and that it would not slip at the bottom, see calculations below.

if the force of the wall acts at right angles to the ladder (mostly horizontally), the wall force will depend only on the lever angle and the center of mass for me and the ladder. It will be somewhat less than the total weight of me and the ladder times sin 20°. Since sin 20° is 0.342, I’ll say the wall force will be less than 30% of the total weight, about 65lb. The wall force provides some lift to the ladder, 34.2% of the wall force, about 22 lb, or 10% of the total weight. Mostly, the wall provides horizontal force, 65 lb x cos 20°, or about 60 lbs. This is what keeps the ladder from tipping backward if I make a sudden motion, and this is the force that must be restrained by friction from the ladder feet. At a steeper angle the anti-tip force would be less, but the slip tendency would be less too.

The rest of the total weight of me and the ladder, the 90% of the weight that is not supported by the roof, rests on the ground. This is called the “normal force,” the force in the vertical direction from the ground. The friction force, what keeps the ladder from slipping out while I’m on it, is this “normal force” times the ‘friction factor’ of the ground. The bottom of my ladder has rubber pads, suggesting a likely friction factor of .8, and perhaps more. As the normal force will be about 90% of the total weight, the slip-restraining force is calculated to be at least 72% of this weight, more than double the 28% of weight that the wall pushes with. The difference, some 44% of the weight (100 lbs or so) is what keeps the ladder from slipping, even when I get on and off the ladder. I find that I don’t need a person on the ground for physics reasons, but sometimes found it helped to steady my nerves, especially in a strong wind.

Things are not so rosy if you use a near vertical ladder, with <10° to the wall, or a widely inclined one, >40°. The vertical ladder can tip over, and the widely inclined ladder can slip at the bottom, especially if you climb past the top of the roof or if your ladder is on a slippery surface without rubber feet.

Robert E. Buxbaum Nov 20, 2013. For a visit to our lab, see here. For some thoughts on wind force, and comments on Engineering aesthetics. I owe to Th. Roosevelt the manly idea that overcoming fear is a worthy achievement. Here he is riding a moose. Here are some advantages of our hydrogen generators for gas chromatography.

Calculus is taught wrong, and is often wrong

The high point of most people’s college math is The Calculus. Typically this is a weeder course that separates the science-minded students from the rest. It determines which students are admitted to medical and engineering courses, and which will be directed to english or communications — majors from which they can hope to become lawyers, bankers, politicians, and spokespeople (the generally distrusted). While calculus is very useful to know, my sense is that it is taught poorly: it is built up on a year of unnecessary pre-calculus and several shady assumptions that were not necessary for the development, and that are not generally true in the physical world. The material is presented in a way that confuses and turns off many of the top students — often the ones most attached to the reality of life.

The most untenable assumption in calculus teaching, in my opinion, are that the world involves continuous functions. That is, for example, that at every instant in time an object has one position only, and that its motion from point to point is continuous, defining a slow-changing quantity called velocity. That is, every x value defines one and only one y value, and there is never more than a small change in y at the limit of a small change in X. Does the world work this way? Some parts do, others do not. Commodity prices are not really defined except at the moment of sale, and can jump significantly between two sales a micro-second apart. Objects do not really have one position, the quantum sense, at any time, but spread out, sometimes occupying several positions, and sometimes jumping between positions without ever occupying the space in-between.

These are annoying facts, but calculus works just fine in a discontinuous world — and I believe that a discontinuous calculus is easier to teach and understand too. Consider the fundamental law of calculus. This states that, for a continuous function, the integral of the derivative of changes equals the function itself (nearly incomprehensible, no?) Now consider the same law taught for a discontinuous group of changes: the sum of the changes that take place over a period equals the total change. This statement is more general, since it applies to discrete and continuous functions, and it’s easier to teach. Any idiot can see that this is true. By contrast, it takes weeks of hard thinking to see that the integral of all the derivatives equals the function — and then it takes more years to be exposed to delta functions and realize that the statement is still true for discrete change. Why don’t we teach so that people will understand? Teach discrete first and then smooth as a special case where the discrete changes happen at a slow rate. Is calculus taught this way to make us look smart, or because we want this to be a weeder course?

Because most students are not introduced to discrete change, they are in a very poor position  to understand, or model, activities that are discreet, like climate change or heart rate. Climate only makes sense year to year, as day-to-day behavior is mostly affected by seasons, weather, and day vs night. We really want to model the big picture and leave out the noise by considering each day or year as a whole, keeping track of the average temperature for noon on September 21, for example. Similarly with heart rate, the rate has no meaning if measured every microsecond; it’s only meaning is as a measure of the time between beats. If we taught calculus in terms of discrete functions, our students would be in a better place to deal with these things, and in a better place to deal with total discontinuous behaviors, like chaos and fractals, an important phenomena when dealing with economics, for example.

A fundamental truth of quantum mechanics is that there is no defined speed and position of an object at any given time. Students accept this, but (because they are used to continuous change) they come to wonder how it is that over time energy is conserved. It’s simple, quantum motion involves a gross discrete changes in position that leaves energy conserved by the end, but where an item goes from here to there without ever having to be in the middle. This helps explain the old joke about Heisenberg and his car.

Calculus-based physics is taught in terms of limits and the mean value theorem: that if x is the position of a thing at any time, t then the derivative of these positions, the velocity, will approach ∆x/∆t more and more as ∆x and ∆t become more tightly defined. When this is found to be untrue in a quantum sense, the remnant of the belief in it hinders them when they try to solve real world problems. Normal physics is the limit of quantum physics because velocity is really a macroscopic ratio of difference in position divided by macroscopic difference in time. Because of this, it is obvious that the sum of these differences is the total distance traveled even when summed over many simultaneous paths. A feature of electromagnetism, Green’s theorem becomes similarly obvious: the sum effect of a field of changes is the total change. It’s only confusing if you try to take the limits to find the exact values of these change rates at some infinitesimal space.

This idea is also helpful in finance, likely a chaotic and fractal system. Finance is not continuous: just because a stock price moved from $1 to $2 per share in one day does not mean that the price was ever $1.50 per share. While there is probably no small change in sales rate caused by a 1¢ change in sales price at any given time, this does not mean you won’t find it useful to consider the relation between the sales of a product. Though the details may be untrue, the price demand curve is still very useful (but unjustified) abstraction.

This is not to say that there are not some real-world things that are functions and continuous, but believing that they are, just because the calculus is useful in describing them can blind you to some important insights, e.g. of phenomena where the butterfly effect predominates. That is where an insignificant change in one place (a butterfly wing in China) seems to result in a major change elsewhere (e.g. a hurricane in New York). Recognizing that some conclusions follow from non-continuous math may help students recognize places where some parts of basic calculus allies, while others do not.

Dr. Robert Buxbaum (my thanks to Dr. John Klein for showing me discrete calculus).

How to make a simple time machine

I’d been in science fairs from the time I was in elementary school until 9th grade, and  usually did quite well. One trick: I always like to do cool, unexpected things. I didn’t have money, but tried for the gee-whiz factor. Sorry to say, the winning ideas of my youth are probably old hat, but here’s a project that I never got to do, but is simple and cheap and good enough to win today. It’s a basic time machine, or rather a quantum eraser — it lets you go back in time and erase something.

The first thing you should know is that the whole aspect of time rests on rather shaky footing in modern science. It is possible therefore that antimatter, positrons say, are just regular matter moving backwards in time.

The trick behind this machine is the creation of entangled states, an idea that Einstein and Rosen proposed in the 1930s (they thought it could not work and thus disproved quantum mechanics, turned out the trick works). The original version of the trick was this: start with a particle that splits in half at a given, known energy. If you measure the energy of either of the halves of the particle they are always the same, assuming the source particle starts at rest. The thing is, if you start with the original particle at absolute zero and were to measure the position of one half, and the velocity of the other, you’d certainly know the position and velocity of the original particle. Actually, you should not need to measure the velocity, since that’s fixed by they energy of the split, but we’re doing it just to be sure. Thing is quantum mechanics is based on the idea that you can not know both the velocity and position, even just before the split. What happens? If you measure the position of one half the velocity of the other changes, but if you measure the velocity of both halves it is the same, and this even works backward in time. QM seems to know if you intend to measure the position, and you measure an odd velocity even before you do so. Weird. There is another trick to making time machines, one found in Einstein’s own relativity by Gödel. It involves black holes, and we’re not sure if it works since we’ve never had a black hole to work with. With the QM time machine you’re never able to go back in time before the creation of the time machine.

To make the mini-version of this time machine, we’re going to split a few photons and play with the halves. This is not as cool as splitting an elephant, or even a proton, but money don’t grow on trees, and costs go up fast as the mass of the thing being split increases. You’re not going back in time more than 10 attoseconds (that’s a hundredth of a femtosecond), but that’s good enough for the science fair judges (you’re a kid, and that’s your lunch money at work). You’ll need a piece of thick aluminum foil, a sharp knife or a pin, a bright lamp, superglue (or, in a pinch, Elmer’s), a polarizing sunglass lens, some colored Saran wrap or colored glass, a shoe-box worth of cardboard, and wood + nails  to build some sort of wooden frame to hold everything together. Make your fixture steady and hard to break; judges are clumsy. Use decent wood (judges don’t like splinters). Keep spares for the moving parts in case someone breaks them (not uncommon). Ideally you’ll want to attach some focussing lenses a few inches from the lamp (a small magnifier or reading glass lens will do). You’ll want to lay the colored plastic smoothly over this lens, away from the lamp heat.

First make a point light source: take the 4″ square of shoe-box cardboard and put a quarter-inch hole in it near the center. Attach it in front of your strong electric light at 6″ if there is no lens, or at the focus if there is a lens. If you have no lens, you’ll want to put the Saran over this cardboard.

Take two strips of aluminum foil about 6″ square and in the center of each, cut two slits perhaps 4 mm long by .1 mm wide, 1 mm apart from each other near the middle of both strips. Back both strips with some cardboard with a 1″ hole in the middle (use glue to hold it there). Now take the sunglass lens; cut two strips 2 mm x 10 mm on opposite 45° diagonals to the vertical of the lens. Confirm that this is a polarized lens by rotating one against the other; at some rotation the pieces of sunglass, the pair should be opaque, at 90° it should be fairly clear. If this is not so, get a different sunglass.

Paste these two strips over the two slits on one of the aluminum foil sheets with a drop of super-glue. The polarization of the sunglasses is normally up and down, so when these strips are glued next to one another, the polarization of the strips will be opposing 45° angles. Look at the point light source through both of your aluminum foils (the one with the polarized filter and the one without); they should look different. One should look like two pin-points (or strips) of light. The other should look like a fog of dots or lines.

The reason for the difference is that, generally speaking a photon passes through two nearby slits as two entangled halves, or its quantum equivalent. When you use the foil without the polarizers, the halves recombine to give an interference pattern. The result with the polarization is different though since polarization means you can (in theory at least) tell the photons apart. The photons know this and thus behave like they were not two entangled halves, but rather like they passed either through one slit or the other. Your device will go back in time after the light has gone through the holes and will erase this knowledge.

Now cut another 3″ x 3″ cardboard square and cut a 1/4″ hole in the center. Cut a bit of sunglass lens, 1/2″ square and attach it over the hole of this 3×3″ cardboard square. If you view the aluminum square through this cardboard, you should be able to make one hole or the other go black by rotating this polarized piece appropriately. If it does not, there is a problem.

Set up the lamp (with the lens) on one side so that a bright light shines on the slits. Look at the light from the other side of the aluminum foil. You will notice that the light that comes through the foil with the polarized film looks like two dots, while the one that comes through the other one shows a complex interference pattern; putting the other polarizing lens in front of the foil or behind it does not change the behavior of the foil without the polarizing filters, but if done right it will change things if put behind the other foil, the one with the filters.

Robert Buxbaum, of the future.

Why random experimental design is better

In a previous post I claimed that, to do good research, you want to arrange experiments so there is no pre-hypothesis of how the results will turn out. As the post was long, I said nothing direct on how such experiments should be organized, but only alluded to my preference: experiments should be organized at randomly chosen conditions within the area of interest. The alternative, shown below is that experiments should be done at the cardinal points in the space, or at corner extremes: the Wilson Box and Taguchi design of experiments (DoE), respectively. Doing experiments at these points implies a sort of expectation of the outcome; generally that results will be linearly, orthogonal related to causes; in such cases, the extreme values are the most telling. Sorry to say, this usually isn’t how experimental data will fall out. First experimental test points according to a Wilson Box, a Taguchi, and a random experimental design. The Wilson box and Taguchi are OK choices if you know or suspect that there are no significant non-linear interactions, and where experiments can be done at these extreme points. Random is the way nature works; and I suspect that's best -- it's certainly easiest.

First experimental test points according to a Wilson Box, a Taguchi, and a random experimental design. The Wilson box and Taguchi are OK choices if you know or suspect that there are no significant non-linear interactions, and where experiments can be done at these extreme points. Random is the way nature works; and I suspect that’s best — it’s certainly easiest.

The first test-points for experiments according to the Wilson Box method and Taguchi method of experimental designs are shown on the left and center of the figure above, along with a randomly chosen set of experimental conditions on the right. Taguchi experiments are the most popular choice nowadays, especially in Japan, but as Taguchi himself points out, this approach works best if there are “few interactions between variables, and if only a few variables contribute significantly.” Wilson Box experimental choices help if there is a parabolic effect from at least one parameter, but are fairly unsuited to cases with strong cross-interactions.

Perhaps the main problems with doing experiments at extreme or cardinal points is that these experiments are usually harder than at random points, and that the results from these difficult tests generally tell you nothing you didn’t know or suspect from the start. The minimum concentration is usually zero, and the minimum temperature is usually one where reactions are too slow to matter. When you test at the minimum-minimum point, you expect to find nothing, and generally that’s what you find. In the data sets shown above, it will not be uncommon that the two minimum W-B data points, and the 3 minimum Taguchi data points, will show no measurable result at all.

Randomly selected experimental conditions are the experimental equivalent of Monte Carlo simulation, and is the method evolution uses. Set out the space of possible compositions, morphologies and test conditions as with the other method, and perhaps plot them on graph paper. Now, toss darts at the paper to pick a few compositions and sets of conditions to test; and do a few experiments. Because nature is rarely linear, you are likely to find better results and more interesting phenomena than at any of those at the extremes. After the first few experiments, when you think you understand how things work, you can pick experimental points that target an optimum extreme point, or that visit a more-interesting or representative survey of the possibilities. In any case, you’ll quickly get a sense of how things work, and how successful the experimental program will be. If nothing works at all, you may want to cancel the program early, if things work really well you’ll want to expand it. With random experimental points you do fewer worthless experiments, and you can easily increase or decrease the number of experiments in the program as funding and time allows.

Consider the simple case of choosing a composition for gunpowder. The composition itself involves only 3 or 4 components, but there is also morphology to consider including the gross structure and fine structure (degree of grinding). Instead of picking experiments at the maximum compositions: 100% salt-peter, 0% salt-peter, grinding to sub-micron size, etc., as with Taguchi, a random methodology is to pick random, easily do-able conditions: 20% S and 40% salt-peter, say. These compositions will be easier to ignite, and the results are likely to be more relevant to the project goals.

The advantages of random testing get bigger the more variables and levels you need to test. Testing 9 variables at 3 levels each takes 27 Taguchi points, but only 16 or so if the experimental points are randomly chosen. To test if the behavior is linear, you can use the results from your first 7 or 8 randomly chosen experiments, derive the vector that gives the steepest improvement in n-dimensional space (a weighted sum of all the improvement vectors), and then do another experimental point that’s as far along in the direction of that vector as you think reasonable. If your result at this point is better than at any point you’ve visited, you’re well on your way to determining the conditions of optimal operation. That’s a lot faster than by starting with 27 hard-to-do experiments. What’s more, if you don’t find an optimum; congratulate yourself, you’ve just discovered an non-linear behavior; something that would be easy to overlook with Taguchi or Wilson Box methodologies.

The basic idea is one Sherlock Holmes pointed out (Study in Scarlet): It is a capital mistake to theorize before one has data. Insensibly one begins to twist facts to suit theories, instead of theories to suit facts.” (Case of Identity). Life is infinitely stranger than anything which the mind of man could invent.

Robert E. Buxbaum, September 11, 2013. A nice description of the Wilson Box method is presented in Perry’s Handbook (6th ed). SInce I had trouble finding a free, on-line description, I linked to a paper by someone using it to test ingredient choices in baked bread. Here’s a link for more info about random experimental choice, from the University of Michigan, Chemical Engineering dept. Here’s a joke on the misuse of statistics, and a link regarding the Taguchi Methodology. Finally, here’s a pointless joke on irrational numbers, that I posted for pi-day.